
Standard Talking Book Player: Getting to Know Your NLS Player
Vikki: Hi, I'm Vikki Vaughan, and today we'll explore the NLS Standard Digital Talking Book player.
If you are unsure about which player you're using, there's an easy way to distinguish between the standard and advanced players. You'll want to locate the round speaker on the front of your player. If there are five keys directly below the speaker labeled info, previous, menu, next, and mark, you have the advanced player. The standard player does not have these five buttons. If you have the NLS Advanced Digital Book player, check out Hadley's version of this workshop, especially designed for your player.
If you have the standard player, you're in the right place for learning everything your player can do. Let's start off by discussing the features found on your player. To begin, we'll place our player on a desk or table top with the handle facing toward us. Just above the handle, which slides in and out for easy storage, we find an opening. This is where we insert our NLS cartridge. We insert our cartridge by holding it with the print brail label facing up, and the end with the hole facing us. We push it gently into the opening. When we're ready to remove it, we place our finger through the hole and gently pull. When the player's turned on and there's no book cartridge inserted in the cartridge slot, or USB port on the side, the player is in describer mode.
NLS Player: Player on, press any button to learn about its function.
Vikki: When any button is pressed, we hear description of that button.
NLS Player: Play, stop. To start or stop playing a book, use the large play stop button. When the book is playing, press the same button to stop the player.
Vikki: This is a great way to get familiar with all of the controls on our player. On the right side of our player we find a small round opening. This is where we plug in our headphones. To the right of that spot for headphones is a small rectangular opening with a plastic cover. This is where we plug in a USB drive. Hadley offer some of our workshops on USB drives. We can also download books from the NLS borrowed library to our own USB drives. If you're interested in learning how, be sure to check out Hadley's instructional series, where we take you step by step to the application and downloading process.
Let's turn our player so the handle is facing away from us. Here we find our power cord in a handy storage compartment. I love the fact that we can store our cord in our compartment when it's not in use. This makes our player super portable and it's easy to charge when we're on the go.
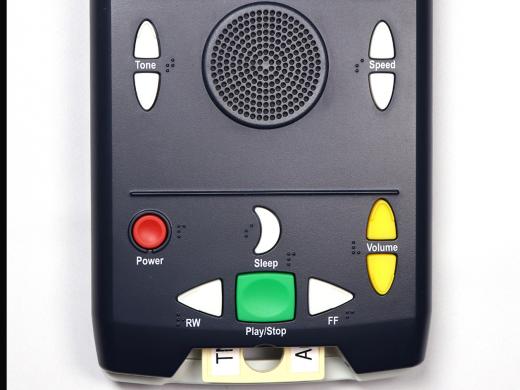
With the handle turned back toward us, let's explore our various buttons. On the row closes to us, we find our rewind or back button. Our play stop button, and fast forward or next button. Each button on our player has a unique shape or raised tactile marking. For example, our play stop button is the largest rectangular button on our player. Its location in the center of the bottom row, plus its bright green color, make it easy to locate. The button is labeled play slash stop, in high contrast print, and has a brail p, placed above it. We press this button to start and stop playback of our digital book.
NLS Player: Moby Dick or The Whale, by Herman Melville.
Vikki: We also use this button to enter and exit the built in user guide. To activate the user guide, we remove the cartridge or USB drive, then press and hold the play stop button for at least three seconds.
NLS Player: Standard player user guide. Section one, welcome. Welcome to your new talking book player standard player user guide. This audio booklet will guide you through the various features the player has to offer.
Vikki: The guide is built in to our player and we can access it anytime we're not using a cartridge or USB drive. To the left of the play stop button we find the rewind button. It is shaped like a left arrow head, with raised tactile lines at the arrows point. It's labeled rw in print, and below it we find the brail letter r. We use our rewind back button to rewind within a book or to move back to previous chapters or books on our storage drive.
On the opposite side of the play stop button, we find our fast forward, next button. It's shaped like a right arrow head with raised tactile lines at its point, just like we found with the rewind button. This button is used to move us forward in a book or to move to the next chapter or book on our portable drive. It's conveniently labeled with the letters ff, and also has the brail letter f to the lower right of the button. With both a rewind and fast forward buttons, we tap each once to move five seconds.
NLS Player: Forward five seconds.
- [Narrator] Literally classics of the United States incorporated, New York, New York.
Vikki: Press and hold to move further into the book.
NLS Player: Forward twenty seconds.
Vikki: Holding one of these buttons for 10 seconds will move 15 minutes in the book. Holding for longer will move chapter by chapter.
NLS Player: Forward. New location.
- [Narrator] Contents.
Vikki: We hear audible beep for each chapter. Above and to the left of the rewind button we find a round button that's sunken down a bit. It has a print label which reads power and a brail letter p on the right side of the button. The power button has a raised tactile circle around its edges to help us easily identify it by touch. I'm sure it's no surprise that this is the button we use to turn our player on and off. It also can be used to check the amount of time left on the battery. We simply press and hold the power button to hear the announcement.
NLS Player: Battery charge remaining, 23 hours.
Vikki: Lastly, the power button can be used to reboot the player. We do this by holding the button down until a beep is heard, usually around eight to 10 seconds. To the right of our power button, and above the play stop button, we find our sleep button. It shaped like a crescent moon, and has a brail s to its left. This button also has a print label which reads sleep. We use this button to set a timer to automatically turn off our player after an allotted time. By pressing our button repeatedly, we can add 15 minute increments to our reading session before our player powers down.
NLS Player: Sleep 15 minutes.
Vikki: Died one.
NLS Player: 30 minutes.
- [Narrator] Tone two.
Vikki: This control is quite handy at bed time when we don't want the player to keep playing after we've fallen asleep. To the far right of our sleep and fast forward buttons we find the volume buttons. They are set up arrow heads, one pointed up, the other pointed down. The buttons are bright yellow and have raised tactile markings at the arrows edges. As with our other buttons, they are labeled in both in high contrast print and brail. To the left of the buttons, we find a brail letter v. Between the two buttons, we see a print label that reads volume. The top button raises the volume while the bottom one lowers it.
NLS Player: Volume up. Volume up. Volume down. Volume down.
Vikki: Each time we press one of the volume buttons we hear a beep, to let us know we changed the volume by one level. It also alerts us when we've reached the maximum and minimum volume levels. There is no mute control on our player. Above these keys we find a raised horizontal line that runs almost entirely across the player. This line divides the tone and speed buttons from the six most frequently used buttons. In the middle of our player, we find a large raised circle. This is our speaker. To the left of the speaker we find a set of buttons shaped like up and down arrow heads. These are our tone buttons. The tone buttons have raised tactile lines at the points edges. They have labels that read tone in print, and a t in brail. By pressing the up button we raise the tone or pitch of the voice.
NLS Player: Tone up. Tone up. Tone up.
Vikki: Pressing the down arrow lowers the voice.
NLS Player: Tone down. Tone down. Tone down, normal.
Vikki: Our player provides a beep with each press of a button. The player also let's us know when we've reached the highest and lowest tone settings. On the right side of the speaker we find a set of buttons which control the playback speed. They are also shaped like up and down arrow heads, but instead of raised tactile lines at the edges, they have a smooth surface. To the left of the buttons, we find a brail letter s. And between the two buttons, we see the label speed in print. When we wish to increase our playback speed, we press the up arrow.
NLS Player: Speed up. Speed up. Speed up.
Vikki: When we prefer to slow the speed, we press the down arrow.
NLS Player: Speed down. Speed down. Speed down, normal.
Vikki: As with our tone buttons, we hear beeps with each press of the speed buttons. The player also let's us know when we've reached the maximum or minimum playback speed. Today, we explored the standard version of the NLS Digital Talking Book Player. I'm Vikki Vaughan and I thank you for joining me.
-
Handouts
Getting to Know Your Standard NLS Player Quick-Start Guide (PDF)
This quick-start guide helps you use a digital talking book player to play audiobooks stored on portable storage devices.
Digital Talking Book Standard Player Series
- Video · 5 minutes
- Video · 7 minutes

Explore
-
The Impact of Vision Loss on a Marriage
Audio · 22 minutes
-
I'm having trouble reading
Resource guide
-
The Crochet Life: 7 Tips for Crocheting After Vision Loss
Article · 4 minutes
-
Embracing Braille
Discussion
- Explore more
Members also liked
- Video · 3 minutes

- Video · 4 minutes
- Video · 5 minutes
- Video · 3 minutes
Join the Hadley Community
Hadley's resources are always available to you. Create a no-cost Hadley account to go further:
-
Pick up where you left off Everything you start is automatically saved across Hadley.
-
Personalized recommendations We'll suggest resources based on your interests.
-
Join live discussions Live and lively discussions on technology, cooking, and more, all geared toward the community of people living with vision loss.
-
Find peer support Connect with people who understand what you're going through.