
Exploring Stand Alone Reader
The Spoken Rx standalone reader from CVS Pharmacy gives you quick and easy access to audible instructions about which CVS prescription you're holding and how to take it.
As a quick recap from the Getting Started workshop, you can get one Spoken Rx standalone reader completely free of charge. The tactile buttons on the reader make it a great choice if the Spoken Rx service on a smartphone app isn't the right solution for you.
Just choose the CVS Pharmacy that's most convenient for you, speak to your pharmacy team about enrolling in Spoken Rx, and mention that you'd like to receive the Spoken Rx standalone reader. If you need more info about this process, check out the Getting Started workshop to get up to speed. You'll be contacted when your Spoken Rx standalone reader is ready for pickup, just as with any other CVS prescription.
Great. Now that you've gotten the reader, it's time to find out what's in the box. The lid of the box is blue and there's a small, round Spoken Rx tag, which feels like a sticker. There's also a helpful curved cutout in the shape of a thumb, and we'll find it as we feel across the long edges of the box. The blank space just above that curve is a perfect indicator for where to lift the lid.
All right, with the lid open, the first thing we'll find is the reader itself, which is resting inside a thin plastic insert. Once we lift out the reader in the insert, we'll find a cable for giving power to the reader. With everything out of the box, let's get oriented to our device.
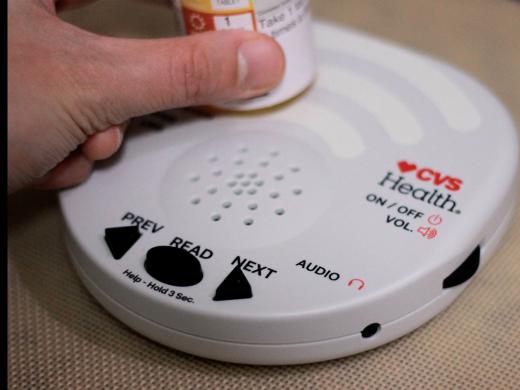
We'll start by placing the reader on a flat surface with the raised round speaker facing upward. Now, let's find the row of three buttons on the reader. We'll turn the device so that these buttons are facing us just below the speaker, with a large area of blank space above the speaker. As we continue learning about how to use our reader, this is the orientation we'll be working with.
Okay, with our reader oriented correctly, let's get to know it a little. We'll start with our row of three buttons below the speaker. The leftmost button actually resembles an arrow pointing left, and it's what we'll use to move backward through information on our reader. Think of it like a rewind button. The second button we'll find is a large oval button with a dot in the center. This is the reader button, and it's what we'll use to start scanning our prescription. The last in our row of buttons is a lot like the first button. Only, this time the arrow is pointing to the right. This is our button to move forward through information. Of course, we'll put it all together as we scan a prescription in the next workshop in this series. But for now, we have an idea of what each button does.
Next, let's check out the sides of our reader. As we explore the left side of the device, we'll find a rectangular opening or port at about the halfway point along the side. This is where we'll give power to the reader. Remember that cable we took out of the box earlier? We'll plug this smaller end of the cable into this opening. If the cable doesn't seem to be slotting into place, just flip it over and try again. Now that the cable is plugged into the reader, the larger end will plug into a USB wall charger. It's an adapter with an electrical plug on one side and a slot for a USB cord on the other. These chargers allow you to plug small devices, like the Spoken Rx standalone device, right into your wall socket. They often come bundled with devices such as cell phones, or you can find them at many retailers.
By the way, our reader can use batteries too. So if we don't want to use a USB cord, let's just flip the device over to find the battery compartment, where we can insert four AA batteries.
All right, back in our standard orientation, with our row of three buttons facing us, let's explore the right side of the device. There are two things of interest here, so let's start with the one furthest away from us. As we move down the right side, we're going to find a dial or wheel. This is what we'll use to not only turn our reader on and off, but to adjust our volume.
We have one last thing to check out, and it's just a couple of inches below our power and volume wheel. It's a small, round hole where we can plug in headphones if we don't want the info from our reader to be played through our speaker. And with that, we now know where everything is located on our reader.
What's next? It's finally time to scan a prescription. Be sure and check out the next workshop in this series where we'll walk through the process of accessing prescription information from the Spoken Rx standalone reader easily and independently.
-
Websites
CVS Pharmacy Spoken Rx Series
- Video · 7 minutes
- Video · 4 minutes

- Video · 6 minutes
- Video · 9 minutes
Explore
-
The Impact of Vision Loss on Marriage, Revisited
Audio · 23 minutes
-
A family member has vision loss
Resource guide
-
10 Tips for Knitting with Vision Loss
Article · 5 minutes
-
Recreation Chat
Discussion
- Explore more
Members also liked
- Video · 3 minutes

- Video · 6 minutes

- Video · 3 minutes

- Video · 4 minutes

Join the Hadley Community
Hadley's resources are always available to you. Create a no-cost Hadley account to go further:
-
Pick up where you left off Everything you start is automatically saved across Hadley.
-
Personalized recommendations We'll suggest resources based on your interests.
-
Join live discussions Live and lively discussions on technology, cooking, and more, all geared toward the community of people living with vision loss.
-
Find peer support Connect with people who understand what you're going through.